
This summer, hundreds of thousands of people will visit Utah’s Mighty Five—five world-class national parks all nestled within the Beehive State. The Mighty Five include Arches, Bryce Canyon, Capitol Reef, Canyonlands, and Zion National Park. If you’re visiting Utah parks and want to plan some epic hikes, I highly recommend building The Narrows (Zion) and Fiery Furnace (Arches) into your itinerary. Here are some tips to make your experience outstanding.
Videos by Outdoors

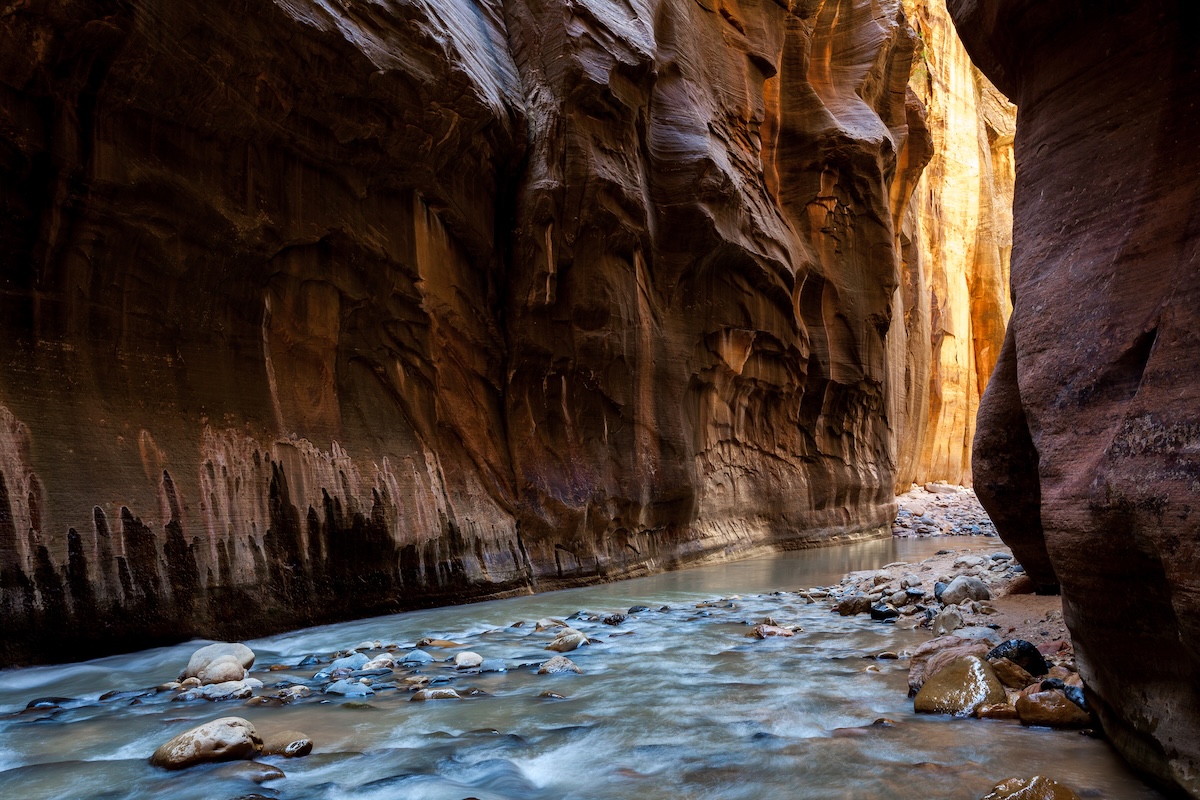
Hiking The Narrows in Zion National Park
The Narrows is a quintessential Zion experience. You hike in the Virgin River through Zion Canyon at its narrowest point, with canyon walls towering 1,000 feet or more on either side of you. It’s epic and well worth the effort. There are several versions of the hike, so you can choose your own adventure, depending on your group’s abilities.
The first time I visited Zion with my family several years back, the hike was closed due to high water levels, but I was determined to go back and try again. This time, the hike was open, and having learned from our previous experience at the park, we didn’t make the same mistakes twice. We were primed and ready for the best Narrows experience possible.
When to Go
First things first, if you’re going to Zion specifically with hiking The Narrows in mind, go during the summer or early fall, when the water is warmest and the water tends to be relatively low. Our first trip was in the spring, when snowmelt made the river unpredictable. This time, we visited in early June. The weather was in the high 80s in the park, but cooler in the slot canyon, and the water was chilly. Be aware that flash floods are possible at any time, and you should always check the water level and flash-flood risk before entering the slot canyon.
Must-Have Gear
We camped inside the park at Watchman Campground, and started our Narrows journey early in the morning to beat the crowds and the heat. We rented e-bikes from Zion Guru to avoid the long shuttle lines, and that was a game-changing decision. When you rent from Zion Guru, you can pay a small fee to pick the bikes up the evening before your day in the park. Otherwise, you pick them up the day of in Springdale (just outside the park), and ride them all the way in.
In addition to renting e-bikes from Zion Guru, we tried out their warm-weather footwear package, which includes a Fitwell Chameleon River Shoe, a pair of neoprene socks, and a white ash walking pole. This was the way to go. Sure, we could have used our own water shoes, but having those neoprene socks and walking poles really did make a world of difference.
The other non-negotiable piece of gear, in my opinion, is a waterproof backpack. I wore the 20L Breakwater Supply River Ute Waterproof Backpack, and I never had to worry about my supplies getting wet, even when the water was up to my mid-section. (Other people were holding their backpacks above their heads.)
Ways to Hike The Narrows
To get to The Narrows and hike the bottom-up route, you either ride your e-bikes or take the shuttle all the way to the Temple of Sinawava—as far as you can go before turning back. You park the bikes at the bike racks, fill up on water and use the restroom, and then start on the 1-mile paved Riverside Walk.
Once that trail ends, you’re officially ready to get in the river and start The Narrows. From here, you can hike upstream as far as Big Spring without a permit. If you go this far, it’s about a 9.5-mile roundtrip trek. Of course, you don’t need to go that far to have a good experience. There are tons of great turnaround spots on the hike, including Mystery Falls, the Grotto Alcove, and the start of Wall Street. If you rent gear and/or e-bikes from Zion Guru, you’ll get a briefing before you head out, which will help you choose your ideal turnaround point for the hike.
If you plan far enough ahead and want the full experience, obtain a permit to do the 16-mile “top-down” version of The Narrows hike, from Chamberlain’s Ranch to the Temple of Sinawava. You must arrange your own transportation to the Chamberlain’s Ranch trailhead.

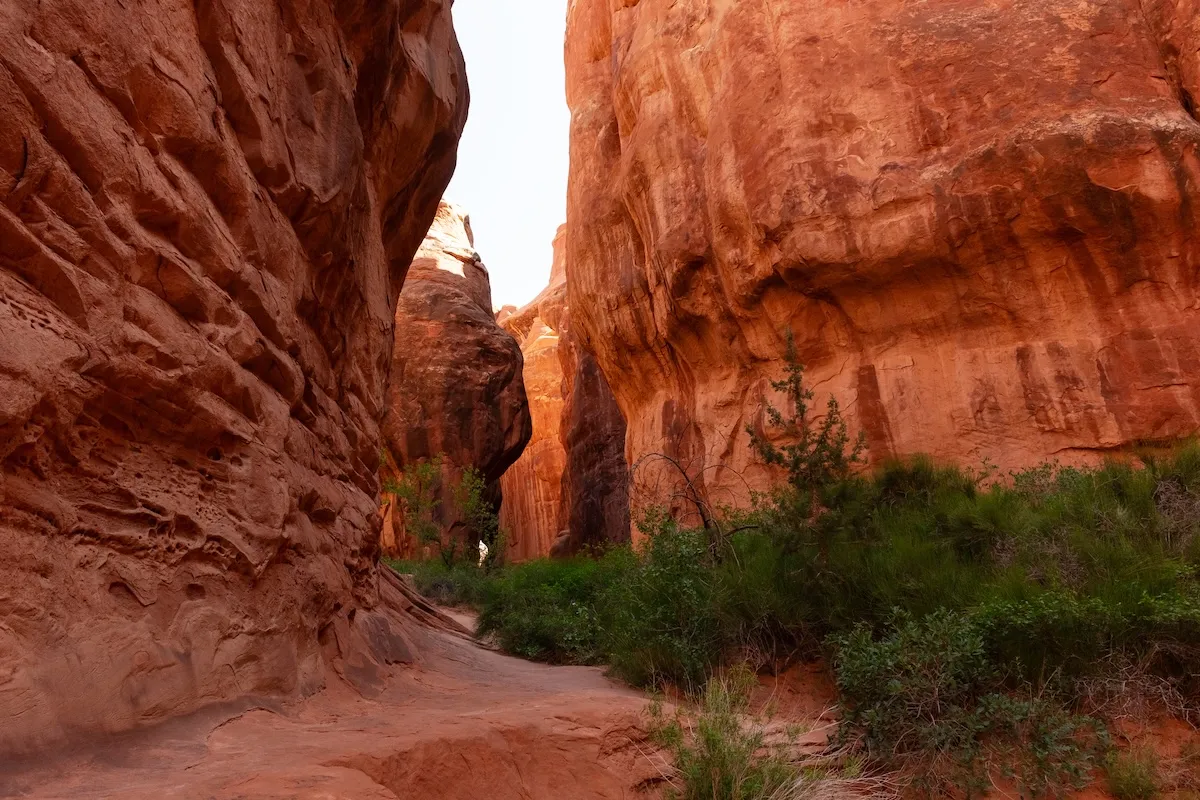
Hiking Fiery Furnace in Arches National Park
A second bucket-list hike in Utah is the Fiery Furnace in Arches National Park. When we spoke to the ranger issuing our permit for this hike, he said it’s hands-down his favorite place in the park. Although this was my first time visiting Arches, I had done my research ahead of time, and I knew that Fiery Furnace should be a top priority.
When planning your visit, be aware that Arches National Park is hot during the summer months, and you should start any hike you do, including Fiery Furnace, early in the morning or late in the afternoon once the sun starts to go down. Always pack more water than you think you’ll need when hiking in the desert.
Another point to note is that the Fiery Furnace trailhead is not close to the entrance of the park. It’s about a half-hour drive. Take this into consideration if you’ll be coming into the park and trying to get an early start for your hike. We camped in the park’s only campground, Devils Garden, which is about a 10-minute drive from the Fiery Furnace trailhead.
Ways to Hike Fiery Furnace
There are two ways to hike Fiery Furnace, and they both require planning ahead. The first way is to obtain a self-guided exploration permit in advance, and even though I did end up getting four spots for me and my family members, it wasn’t exactly easy. (See the following section for details.)
The second way to hike Fiery Furnace is to go with a ranger. The ranger-guided hike, available seasonally from May to September, also requires a permit obtained in advance through Recreation.gov. The ranger-guided hike is 150 minutes long and covers a distance of 2 miles. Scrambling is required.
Both permits (the self-guided permit and the ranger-led tour permit) are highly sought after, and only a limited number of them are available each day. Self-guided permits cost $10 per person, and ranger-led tours cost $16 per person. No children under the age of five are allowed into the Fiery Furnace, and groups are limited to six people or less.
Obtaining a Fiery Furnace Permit
To get yourself a permit to explore Fiery Furnace, be on Recreation.gov at 8 AM Mountain time exactly seven days before your intended visit date. Know which permit you’re going for in advance and, if applicable, which time you want (only applies to ranger-guided tours). Have your Recreation.gov account set up, and sign in to it before the clock strikes 8 AM.
Even if you’re ready to go seven days before your intended visit date at 8 AM Mountain time, you might not get a permit. I didn’t the first time I tried. The system wouldn’t let me make a reservation, because it “couldn’t verify that I was a human.” Thankfully, we were able to reserve four spots for the following day once that opened up, and we changed some things around on our itinerary to make it work.
Once you get the reservation, you’ll need to pick your permit up in person the day before your hike or the day of your hike at the Arches Visitor Center. I highly recommend arriving the day before your hike, because you will need to sign paperwork and watch a video before they’ll issue the permit. All members of your party must be present for this process.
Once you get the permit, you must display it on your pack while in the Fiery Furnace, and you can enter the area any time between sunrise and sunset on the day of your reservation.
What to Know in Advance
Ok, now that you’re finally in the Fiery Furnace, it’s time to find out why it’s worth all this hassle. This isn’t your typical 2-mile loop hike. Rather, it’s a labyrinth of slot canyons, large boulders to scramble up and over, and intriguing dead ends.
If you’re on the ranger-guided tour, you’ll have a much more organized experience. If you do the self-guided hike, like we did, buckle up for some fun. There are small arrows that’ll lead you on the same path the ranger-led hike takes, and, for us, it was a blast trying to find those tiny arrows. They really blend in!
You will definitely get lost in the Fiery Furnace, and that’s ok, as long as you keep your wits about you. We had downloaded an offline map of the area using the onX Backcountry app ahead of time, and it was extremely helpful for pointing us in the right direction when those arrows eluded us completely.
There is scrambling required to get through the Fiery Furnace loop, and there are parts of the hike that are relatively high and exposed. We did it with two kids, and they loved every minute.
One final tip: When you park at the trailhead, don’t follow the wide dirt path going perpendicular to the fence. That’ll lead you into the loop backward (the arrows will be even harder to find, and they’ll point to where you came from instead of where you need to go). Instead, follow the smaller trail down a hill that runs parallel to the fence. That’ll put you on the loop going in the right direction.
This post contains affiliate links. Outdoors.com may earn a commission when you make a purchase through these links. Thank you for your support.


Pingback: Outdoor Gear to Turn up the Heat (and the Fun) This Summer – ..:INHIL COMMUNITY NETWORK:..